


|
Modeling Tips
Below are some modeling tips from ASMS members. We hope to expand
this section considerably, so send us your tips and we will be happy to add them.
Click here to submit a tip.
Removing Paint Overspray from Glossy Painted Surfaces
By Tim Robb
|
|
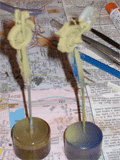
If you have a slight overspray on a GLOSSY painted surface it can be removed with a Q-tip and toothpaste. Toothpaste is mildly abrasive so dipping a wet Q-tip into a little toothpaste gives a little sanding swab. Rub this on the overspray, starting gently and increasing pressure as necessary. This just takes a couple of minutes so is faster than loading up the airbrush and re-painting.
I use this technique sometimes when airbrushing exhaust stains. I will deliberately gloss the surface before freehand airbrushing the exhaust stain. Then clean up overspray with the toothpaste.
|
Stripping Paint off Styrene or Resin
By Rick Willaman
|
|
 After 4 years, I finally got that discontinued model that I'd been looking
for. The kit was partially painted and needed to be stripped. After searching
the web, I decided not to use the ever popular 'Easy Oven Off' spray cleaner
and instead used biodegradable 'Simple Green'. I poured some in a plastic
container, submerged the model, and let it sit overnight. The next day the
paint was wrinkled and ready to slide off. For the nooks and cranny's, I
used a motorized tooth brush and the bristles got out all the paint
leaving me with the sharp original edges that I was looking for. After 4 years, I finally got that discontinued model that I'd been looking
for. The kit was partially painted and needed to be stripped. After searching
the web, I decided not to use the ever popular 'Easy Oven Off' spray cleaner
and instead used biodegradable 'Simple Green'. I poured some in a plastic
container, submerged the model, and let it sit overnight. The next day the
paint was wrinkled and ready to slide off. For the nooks and cranny's, I
used a motorized tooth brush and the bristles got out all the paint
leaving me with the sharp original edges that I was looking for.
|
Packaging your Finished Models for Shipping or Transport
By Richard Eaton
|
|
Whether you are shipping your finished model half way around
the world or just want to get it across town to a model show,
you want it to get there in one piece. Here are some notes
from Richard's presentation at the June meeting that will
help you do just that.
The key to all of this is to keep the model from moving inside
the box and to protect it from any impact to the box.
- If your model is on a base, remove the model from the
base and tape the base to the bottom of your box.
- Place your model in a sealable plastic bag. This will
prevent you from losing any parts that might fall off. Be
sure to burp as much air as you can out of the bag as you
don't want the model sliding around inside the bag.
- When the model is placed inside the box, it should be
completely surrounded by packing material capable of keeping
the model immobile and absorbing any impact to the box.
No part of the model should be touching the sides of the
box. For packing material there are several options, including
plastic grocery bags, soft Styrofoam peanuts, etc. But the
best option is a material called Poly-Fill. This is a cotton-like
material available in many craft and fabric stores. (It
is used to stuff pillows.) It is inexpensive, easy to mold
around the model and good at absorbing impact.
- Double box. This is especially important for larger or
heavier models as they require extra impact reduction. After
you have ensured that your model is immobile and well protected
inside the first box, place that box inside a larger box
and surround it with packing material (Poly-Fill, peanuts,
etc.) so that the outside of the inner box does not touch
the inside of the outer box and there is a couple inches
of padding between them.
- If you are sending your model through the mail, especially
out of the country, be sure to check the latest postal regulations
regarding the allowable size of the box.
Of course, the above might be overkill if you are just taking
your model to a local meeting or show. But remember that you
still want to reduce the chance for damage. You still want
to be sure that the model is padded and immobile. You should
put the model on the passenger seat as opposed to in the trunk
as it will offer much better shock absorption.
|
Paint Your Model, Not Your Fingers
By Mike Gilsbach
|
 I have tried lots of ways to keep small parts and sub-assemblies in
place while I airbrush them - large tweezers, tape, fingers - but this might be the best I have found so far. As a gag gift
last Christmas, I got a set of four desktop note holders. They are just small alligator clips attached to weights by a short piece
of metal cable. They are perfect for holding stuff in place for the airbrush and to keep stuff from getting lost on your workbench. The clips are strong enough to hold, but they
don't gouge the plastic. I have tried lots of ways to keep small parts and sub-assemblies in
place while I airbrush them - large tweezers, tape, fingers - but this might be the best I have found so far. As a gag gift
last Christmas, I got a set of four desktop note holders. They are just small alligator clips attached to weights by a short piece
of metal cable. They are perfect for holding stuff in place for the airbrush and to keep stuff from getting lost on your workbench. The clips are strong enough to hold, but they
don't gouge the plastic.
|
Wing Leading Edge Landing Light Covers
By Tim Robb
|
Whether you are using the kit supplied light or replacing it with an MV Lens from the model
railroad department, here's a quick and easy upgrade to the kit supplied clear plastic part for
your wing leading edge landing light covers. This will be installed as one of the finishing touches
on your model so you will not need to come back and mask over it. Here it is:
- After the landing light of your choice is installed, apply a
strip of Scotch brand "Crystal Clear Tape" over your landing
light opening. This tape has a bright red label.
- Using a brand new #11 X-Acto blade, trim around the edges of the opening to trim away
the excess tape.
- The tape itself is not sticky enough to stay stuck down indefinitely so peel up the top and
bottom of the light cover, one side at a time, and paint on a little diluted white glue and press them
back down.
|
Getting a clean tire/hub boundary when painting one-piece wheels
By Mike Gilsbach
|
| I actually learned this from ASMS member Dave Orloff at a meeting
a few months back. Paint the entire wheel the base hub color. Then
use a small brush to place a bead of window cleaner along the edge
where the tire meets the hub. Usually, there is a ridge of some
type between them and this technique works really well in such cases.
Then load your paint brush with the tire color and touch the end
of it to the edge of the window cleaner. The capillary action will
pull the tire color in tight around the edge of the hub, giving
you a nice clean boundary. You will need to experiment a little with the amount of window cleaner. Too much and
it will overflow into the hub, taking the tire color with it. Too little and you won't get the desired capillary
action.
|
|


