
          
|
Building Italeri’s Eurofighter Typhoon 1/48 scale, Kit #862By Tim Robb, Originally published September 2004
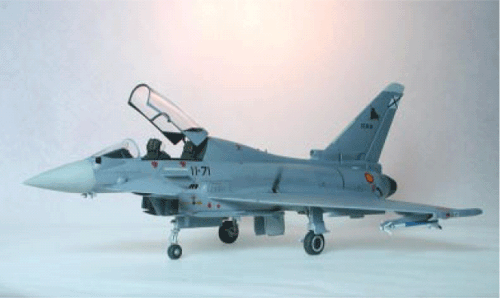
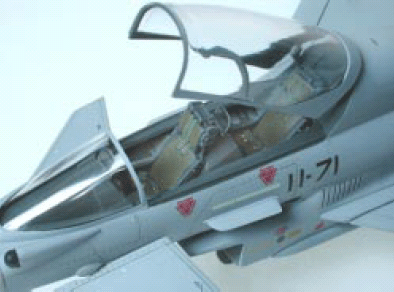
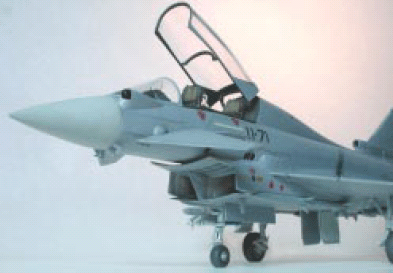
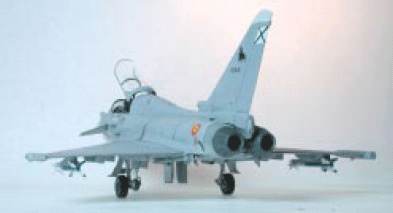
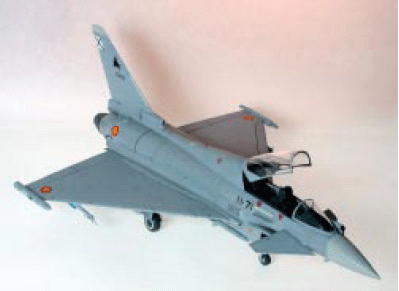
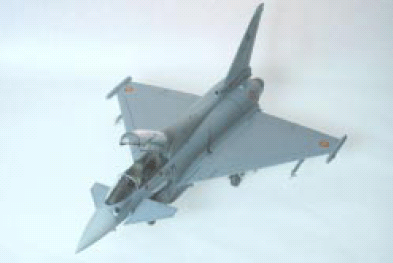
The Eurofighter Typhoon is just now entering service in the UK, Germany, Italy, and Spain so this model kit is of a very new airplane. The Eurofighter is designed with both air to air and air to ground capability. It’s very newness presents some modeling challenges in the way of reference materials since there aren’t a lot of books around. Eurofighter GmbH, based in Hallbergmoos, Germany, is a consortium set up to manage the development and production of the weapon system. It is owned by three partner companies, Alenia Aeronautica 21%, BAE Systems 33%, and EADS (CASA and DASA) 46%. This information is straight from the Eurofighter.com website, which was the main reference I used in building the model. A new airplane deserves a new way to research the model, don’t you agree? I viewed lots of photos on Eurofighter.com and also Airliners.net and answered all my “what does this look like? where does this go? what color is this? where do these stencils go?” questions that way. Italeri kit number 862 is of the two-seat variant of the aircraft. The kit is molded in gray plastic with one sprue of clear parts. The gray plastic is fairly soft and is easy to work with. The clear parts are brilliantly clear and the plastic on them is harder. Stores included are two sidewinders, two drop tanks, and four AIM- 120 missiles. Decals are provided for service test aircraft for the UK, Germany, Italy, and Spain. I don’t particularly like service test aircraft markings so to build an early squadron service machine my first task was to study photos on the web and see if I could find enough similarities in markings on any of them to make a go of it with the kit decal sheet. You can do it with just the kit decals if you choose the German machine with national insignias in four positions. The Italian, Brit, and Spanish birds all have national insignias in six positions, and only four of each are provided on the decal sheet. The insignia that the service test aircraft carry in the other two positions is a multinational insignia. I really liked the Spanish machine with the bright, red-yellow-red roundels, St. Andrew’s cross on the tail, and the bull insignia also on the tail best. I found out from the hobby shop that Bondo had also purchased a kit so I contacted him and he was kind enough to help me out by sending me the extra Spanish decals I wanted—thank you Bondo! On to the building. The cockpit consists of a simple cockpit tub with decals for consoles and instrument panels and very simple— no, let’s be truthful—crude ejection seats. The seats in the Eurofighter are the brand new Martin Baker Mk.16A. There is an excellent shot of the seat alone, removed from the aircraft to be found at www.topfighters.com/eurofighter_mk16.php. I took one look at the kit seats compared to this photo and immediately thought “aftermarket seats.” I didn’t find them. I couldn’t find any Martin Baker Mk 14s that the Mk. 16 is derived from either. Next I thought about building the model with the canopy closed to obscure the problem a little so I checked the fit of the canopy and windscreen parts. The front of the canopy part is a full 1/8” narrower than the back of the windscreen part so this canopy is going to be posed open.
So, into the spares box I went, digging for stuff to busy up the kit seats. I detailed the seats with bits of plastic card and rod, landing gear struts from a 1/144 scale F-5E, and the center sections cut from some 1/72 triple ejector bomb racks left over from an A-7 kit. Painted up with a wash and a dry brushing, they look pretty busy and even in the right areas. I sanded off the molded-in seat belts and replaced them with some Eduard prepainted green USAAF WW II belts. Someday there will be an aftermarket cockpit set for this kit, maybe there is already. It needs it.
Assembly of the airframe is pretty simple. The big canopy fairing/fuselage spine had long sinks on both sides. The multiple pieces of the intake area fit together pretty well. The kit gives the option of posing the big speed brake on top of the fuselage open, and also the air-to-air refueling probe on the starboard side of the nose. I didn’t see any photos of parked airplanes with either of these open, so I fitted them in the closed position, in which they don’t fit very well. Photos of parked airplanes do show the wing leading edge slats open, but these are not provided as separate parts in the kit. I didn’t open them. I used my favorite filler, Gunze Sangyo Mr. Surfacer 500, to correct the fit problems on the speed brake, refueling probe cover, and also the big long sinks on the fuselage spine. Mr. Surfacer 500 brushes on as a thick liquid, and when dry it can be rubbed down smooth with denatured alcohol on a cotton swab so there is no sanding and therefore no loss of the kit’s surface detail. It works really well for sinks and for any narrow gap between parts that come together at an angle.
Two areas of the airframe, the outside edges of the jet intake part where it joins to the fuselage and the jet pipe piece where it meets the rear of the fuselage, did not fit well, leaving gaps of about 1/32”. I already said the intake parts fit pretty well so this is a contradiction and here’s the explanation: the interior parts of the intake that would be difficult to work with do fit pretty well, but the gaps are left on both fuselage sides where they are easy to get at. I filled them with plastic card and filler and sanded them smooth with no problem. They are on an area of the model where there is minimal surface detail to lose, and it will later have various stencils applied there too. The jet pipe gap is a little tougher. Since the plane is a twin-engine jet, the part is curved around the two engines. I filled it in with plastic card and gap filling super glue. I chose super glue here anticipating loss of surface detail that would require some rescribing. Mr. Surfacer is a bit too soft to scribe on for me. On hard plastic, super glue dries at about the same consistency of the plastic and scribes OK. This kit is in soft plastic and the rescribing didn’t work out very well for me. Fortunately, my poorly re-scribed line is at a place where the gray fuselage joins to the metal tail section so is somewhat less noticeable. It is also on the bottom side of the model. If I had it to do over again, I would not try to re-scribe that line, I would just draw it in with a pencil. The body work done, on to the painting.
The plane is overall light gray. The instruction sheet gives the color as FS 36375 light ghost gray, and that looks pretty close to me. The landing gear struts, wheel wells, and jet intake are all a glossy light gray color. No reference to this color was given on the kit instruction sheet. I used FS 36495 because I had it on the shelf already. It looks OK to me. Compared to the white used in these areas on US jets, this is toned down a bit, but still allows ground crews to spot hydraulic leaks if the fluid has red dye in it. That is just a speculation on my part and has nothing whatsoever to do with building the model, sorry. Masking the complex shapes of the wheel wells and the intake took awhile, but you gotta do it to get the look of the airplane right. The nose cone, fin tip, and a small rectangular area of the spine are painted in another shade of light gray, somewhere in between the light ghost gray and the light gray intake and wheel well color, that also has no color reference in the kit instructions. I had some US Navy light gull gray on the shelf but it didn’t look quite right. I used a 50-50 mix of the light gull gray FS 36440 and the light gray FS 36495 that looked close enough to keep when I applied it. The decals worked pretty well and were in register. I did have some silvering on some of the smaller ones, probably because I left them in the water too long or worked too slowly with them. I finished out my Spanish service scheme with some plain black code letters, and some low viz formation light decals. The serial number on the decal sheet, XCE.16-01, got shortened on the service scheme by removing the “X” from the front of it, and CE-16-01 is the correct serial number for aircraft number 11- 71. There are numerous photos of this bird on the Eurofighter site. The bull insignia on the decal sheet has the bull turned with horns forward on both sides of the tail fin. This is incorrect, the bull’s horns are to the left on both sides of the plane. With Bondo’s extra sheet, I got this right on the model. The bull insignias are a little too large, and there is another insignia lower down on the tail fin that I am missing. Too bad, so sad. You can do a more accurate German scheme if you want to, I like my Spanish bird. Since this is a model of a new aircraft, I gave it only a very light wash. None of the photos I looked at showed dirty airplanes, but they did universally show a black stain on the port side of the fuselage above a vent at the wing fuselage joint. I put that on with black pastel. Now for the finishing touches. The landing gear parts work well. This is a really good area of the kit. They do all require cleanup of mold parting lines. I already told you that the canopy doesn’t match up to the windscreen and must be posed open. There are other problems with the clear parts too. The HUD parts are the wrong shape. They are molded in a sort of rounded rectangular shape with frames molded around them. The real ones are round in shape with no frames. The kit parts have a nifty little mounting bracket molded onto the bottom of them, so I sanded the kit parts down to the right shape, polished them back to clear, and used them. The wing tip lights aren’t there at all. The solid back-side of the fairings for these lights are molded onto the wing tip pods, but there are no clear parts to go on in front of them. Into the spares box again, I found some 1/ 144 scale 750 pound bombs that had about the right curvature to them. I sanded them down flat on one side, cut off the length needed from the front, and put them on. Then I painted them a silver undercoat, with a food coloring and Micro Kristal Klear top-coat to represent the colored transparencies. Done! I like the model. It looks good finished. There’s a lot more to do on a model of a two-seat, twin engined jet fighter with six missiles hung underneath it and complex engine inlet and landing gear struts, than there is to do on my usual WWII single engine prop jobs. Must be why I build more prop planes. I recommend this kit to you, especially as soon as there are cockpit detail sets, or even just Martin Baker Mk.16A seats, and some aftermarket decal sheets available to go with it. Go build a model!
|
© Copyright 2010, Austin Scale Modelers Society (ASMS)