|
Building Academy Minicraft’s 1/48 Piper Cherokee 140By Tim Robb, Originally published March 2005
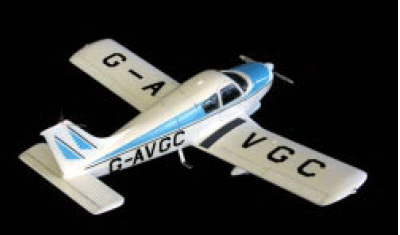
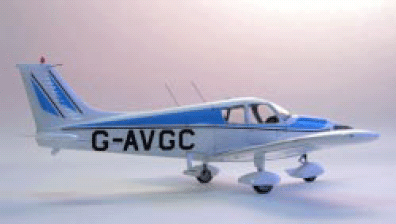
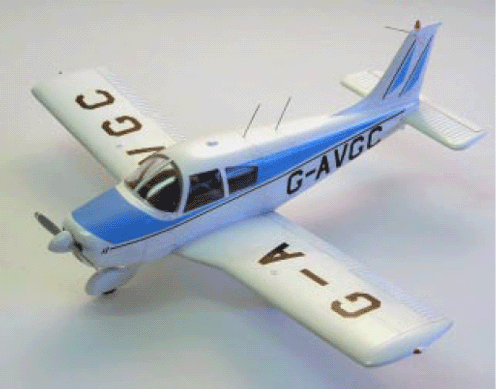
Piper introduced the PA-28 Piper Cherokee in 1961 as a replacement for the Piper Cub. The basic model PA-28-140 is a four-seat, low wing, all metal monoplane with fixed gear, and powered by a 150 hp Lycoming engine. Follow on designs are the PA-28-161 Warrior, and PA-28- 181 Archer, featuring various upgrades. Academy Minicraft’s PA-28-140 kit comprises 32 parts molded in white plastic and six clear parts. The surface detail of the kit is good, and the interior is nicely done for a simple kit. The interior consists of floorboard, two front seats, a simple one-piece back seat, instrument panel, and two control wheels. There is a nice representation of the Lycoming motor and motor mount. This is good because the air cooled engine is visible both through the cooling openings in the front of the cowling and through an opening in the underside of the cowling where the nose gear strut also attaches to the firewall. The fixed tricycle undercarriage is molded in just two parts for each wheel. The wheel pant, tire, and strut assembly is molded as one piece for each leg and the second piece is the other half of the wheel pant. The decal sheet is worthless, more on that later. I didn’t have any reference materials at all for this airplane, so I started my study by logging onto Airliners.net. The painting instructions in the kit are pure fantasy. There are hundreds of photos of Cherokees on Airliners.net and none of them has a color scheme similar to what is shown in the kit’s painting instructions. Another not quite inaccuracy but shortcoming the kit has is that most Cherokees operate without wheel pants, or at least without all three of them, so it would have been preferable for this kit to come with a more detailed undercarriage that made the wheel pants optional. Given those two things, my first chore was to scroll through the Cherokee photos and find one with a simple enough scheme that I could paint that was also at the same time an aircraft wearing all three wheel pants. I settled on a British civil registered aircraft, G-AVGC pictured at Popham, UK in June, 2003. It wears the same light blue and white colors (excuse me, “colours” – it’s a Brit) as the model shown on the kit box top, but there the similarity ends. On to the building. The simple interior goes together well. The instrument panel is molded with raised circular gauges, but no faces to them, and no instrument panel decal is provided. The kit’s white plastic came in handy here. I painted the whole thing a scale black color and then scratched off a little of the black on the face of the gauges to represent numbers, dials, etc. A follow on dry brush with white and a drop of Micro Kristal Klear onto each instrument face and the panel was quickly done and looks good compared to photos too. After painting the rest of the interior I added simple lap belts to all four seats and that finished the interior.
Now glue it all together, finish the seams and paint it up, right? Well yes, but there are still some challenges. The fuselage halves stop at the firewall and the engine cowling is molded in a bottom / front piece, and a wrap around top piece. There is just a little room in between the firewall and instrument panel and I fit a penny and two small fishing weights in there – all there was room for - and thought it would be enough to make the model stand up on its nose gear by the time the motor and cowling went on. I was wrong but will come back to that; let me talk about the engine next. The Lycoming and its mount are molded in ten parts. The instructions were not very clear on where these all went, just showing some arrows pointing to the general area, but this is not too hard to muddle through. When the motor and cowling were fastened to the rest of the model I discovered the weight I was able to get into the space behind the firewall was inadequate to make the model sit up on its nose gear. The cowl fits fairly tightly around the engine and there are parts of the engine visible through the three openings in the cowl. There was no room for more fishing weights. I went to bed and thought about it. The next day I took a lead fishing weight and tried to mash it flat between a pair of pliers. It gave a little but not enough, so then I laid it on the handle of my bastard file (the big one for woodworking in one to one scale) and pounded it flat with my hammer. (That was some of the most satisfying modeling I have ever done.) With a few weights now flattened into lead sheet, I lined the interior of the cowling in places that didn’t show through the openings and this was enough weight. You could just use lead foil but it is FUN to pound fishing weights flat! Now after finishing all the seams I should have been ready to paint, but the model didn’t look right. At this point let me tell you that the other model I was building at the same time was a Tamiya Brewster Buffalo. The Buffalo kit has nice deep recesses for the tailplane parts to fit into, and an equally sure method of mounting the wing to the fuselage. The Buffalo kit is idiot proof on alignment. The Piper Cherokee kit is not idiot proof and I proved I was the idiot. I had the wing on with right side swept forward and left side swept back or vice-versa. So I took it off, reattached it correctly, filled larger gaps than I filled the first time, got ready to paint again, primed it with Floquil Reefer White, and painted it all a nice gloss white with Testors enamel from the little bottle. I like the little bottles for glossy enamels. But the model still did not look right. This time the problem was that the one-piece tailplane part was too low on one side and too high on the other. So I took it off, worked on the opening it fit into until it would go on level, re-attached it, filled larger gaps than the first time, re-primed, and repainted.
Most of the schemes I saw in the photos were too elaborate for me to attempt, but would be fairly simple to apply from accurate decal sheets. I scrounged into my decal box for some black letters and black striping and applied the decals. Next, I sealed the decals and applied a thin black wash into the control surface hinge lines. The molded in lines were not deep enough to take this cleanly, so I had to scribe them a little deeper. I love doing that on an already painted and decaled model, don’t you? Next I put in the clear parts. The four side windows fit well, but there is a big gap either above or below the windshield, your choice! I chose below and filled it with several applications of white glue. The white glue levels itself as it dries and there is no need to come back and sand it. You can paint over it just fine with Testors enamels. G-AVGC has a tall red strobe on the top of the tail fin. I modeled this by taking a piece of clear sprue, inserting it into my Dremel tool, and sanding it down to the right diameter by holding the spinning sprue against sandpaper. Then, with the sprue still in the Dremel tool, I polished it back to clear in the same manner with a set of Micro-mesh polishing cloths. Next I took it out of the Dremel, cut it to length, glued it on the top of the tail fin, and painted it red with Kristal Klear tinted with red food coloring. I wouldn’t have had to do that last part if I had some clear red sprue around, maybe from a car kit, but I don’t do cars. Now add antennas accurate to the aircraft you have chosen to model (none are provided in the kit), add the boarding step, an MV lens for the landing light in the nose, stick the prop on the front, and its finished. This kit was my “white elephant” from the Christmas party exchange and I never would have picked it for myself, but know what? When I got into the building, this was every bit as enjoyable as any other model airplane I’ve built, and it makes a handsome little model. It gives a sense of size to all those warplanes in my display case too, and additionally gives me something to point to if I’m ever asked if I only build models of instruments of death. Academy Minicraft has several other kits in their series of civil light planes in 1/48. Try one!
|
© Copyright 2010, Austin Scale Modelers Society (ASMS)
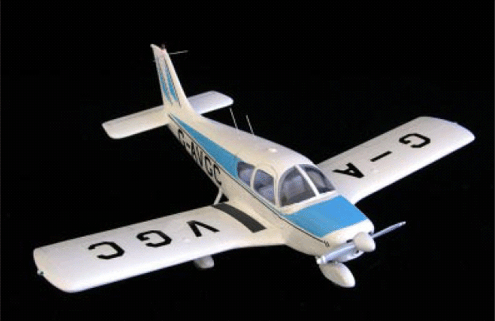
 Now, finally ready for the second color, I masked off the blue
parts on the fuselage and painted. G-AVGC has a simple blue
pattern on the fuselage with a thin black cheat line below it. The
tail fin has two blue chevrons, also with a thin black stripe next
to each. I did the blue with paint and the black with decal stripe.
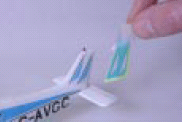
For the chevrons on the tail fin,
I made a mask by drawing them
to the size I wanted on a piece of
post it note, and cutting out the
chevrons with my X-Acto knife.
I taped the mask onto the tail fin
and sprayed straight down onto
it, stopping just as soon as I had paint coverage. The following
day I removed the mask, flipped it over, and repeated on the
other side of the fin. This worked well. G-AVGC has “Cherokee
140” in small white letters on the black cheat line on the engine
cowling. It would have been nice if the kit decal sheet included
this but it didn’t. It had the words “Piper”, and “Beech”, but in
black only and too large. It also has a few letters and numbers
in both black and white for the modeler to (shudder) make up a
serial number. Apparently it is a generic sheet that goes into this
whole series of light plane kits. It also would have been nice if
there were striping options for one or more aircraft in actual
factory color schemes.